June 21, 2018

SharedPreferences in Kotlin

                 On this blog I am going to explain how to use SharedPreferences in Android Kotlin. As you knew SharedPreferences is used for saving application data as key-value pair. You can find more about shared prederance from Here.


Here I am creating a new class AppSettings. With the help of this class we are going to save a String, Boolean, Int values..


Java Code


class AppSettings(context: Context) {
    val PREFS_FILENAME = "BMatesTechnologies"

    val UserID = "UserID"  //Int value
    val LoginStatus = "LoginStatus" //Boolean Value
    val UserEmail = "Email"  //String Value

    val prefs: SharedPreferences = context.getSharedPreferences(PREFS_FILENAME,
 Context.MODE_PRIVATE);


    var userId: Int
        get() = prefs.getInt(UserID,0 )
        set(value) = prefs.edit().putInt(UserID, 0).apply()

    var loginStatus: Boolean
        get() = prefs.getBoolean(LoginStatus, false)
        set(value) = prefs.edit().putBoolean(LoginStatus, value).apply()

    var email: String
        get() = prefs.getString(UserEmail, null)
        set(value) = prefs.edit().putString(UserEmail, value).apply()

}


I am using the following method to save or get values from the shared Preferance.


Initilize AppSettings

     var appSettings: AppSettings? = null


Declaration

     appSettings = AppSettings(applicationContext)


Assigning Values


     appSettings!!.loginStatus = true

     appSettings!!.email = "shidhi.shidhin@gmail.com"

     appSettings!!.userId = 1


---------------
Thanks For Reading, Wish you a Happy Coding....

June 20, 2018

Capture Image Using Camera

       On this blog I am going to Explain How to capture Image. Here I am using FileProvider for Capture Image. Here is the steps to integrate Image Capture using Camera on your application.

Add Camera Permission

         We need to Add the Camera permission on AndroidManifest.xml file like,


<uses-permission android:name="android.permission.CAMERA" />
<uses-feature android:name="android.hardware.camera" />
<uses-permission android:name="android.permission.WRITE_EXTERNAL_STORAGE" />
<uses-permission android:name="android.permission.READ_EXTERNAL_STORAGE" />


Add File Provider

         We need to Add provider inside the application tag on AndroidManifest.xml file like,

<provider
   android:name="android.support.v4.content.FileProvider"
   android:authorities="${applicationId}.fileprovider"
   android:exported="false"
   android:grantUriPermissions="true">
      <meta-data
      android:name="android.support.FILE_PROVIDER_PATHS"
      android:resource="@xml/file_paths"></meta-data>
</provider>


Add file path

          Inside the  provider tag we added android:resource="@xml/file_paths", we need to add new folder xml(If the folder not exist inside the res folder) and inside the xml folder we need to add new resource file file_paths with the below content,


<?xml version="1.0" encoding="utf-8"?>
<paths xmlns:android="http://schemas.android.com/apk/res/android">
    <external-path name="my_images" path="Android/data/com.android.myapplication/files/Pictures" />
</paths>


Java Code

          Here I am capturing the image using my function takePicture(), Before calling this function I am checking the camera permission using my function checkCameraPermissionGranded(), On the Camera Button Click I am using,


if (!checkCameraPermissionGranded())
    requestCameraPermission();
else                    
    takePicture();


Check Camera Permission
private boolean checkCameraPermissionGranded() {
        if (ActivityCompat.checkSelfPermission(HomeActivity.this, android.Manifest.permission.CAMERA) == PackageManager.PERMISSION_GRANTED &&
                ActivityCompat.checkSelfPermission(HomeActivity.this, android.Manifest.permission.WRITE_EXTERNAL_STORAGE) == PackageManager.PERMISSION_GRANTED &&
                ActivityCompat.checkSelfPermission(HomeActivity.this, android.Manifest.permission.READ_EXTERNAL_STORAGE) == PackageManager.PERMISSION_GRANTED) {
            return true;
        } else
            return false;
}


Request Camera Permission


      If the permission is not given we will request permission for access camera for our application using requestCameraPermission() methid. Once user grand permission it will automatically execute override method onRequestPermissionsResult. 


    private void requestCameraPermission() {
        ActivityCompat.requestPermissions(HomeActivity.this, new String[]{android.Manifest.permission.CAMERA,
                android.Manifest.permission.WRITE_EXTERNAL_STORAGE, android.Manifest.permission.READ_EXTERNAL_STORAGE}, Constants.CAPTURE_REQUEST_CODE);
    }


    @Override
    public void onRequestPermissionsResult(int requestCode, String[] permissions, int[] grantResults) {
        if (requestCode == Constants.CAPTURE_REQUEST_CODE) {
            if (checkCameraPermissionGranded())
                takePicture();
            else {
                requestCameraPermission();
                Toast.makeText(HomeActivity.this, "Permission Not Granded", Toast.LENGTH_LONG).show();
            }
        } else if (requestCode == Constants.LOCATION_REQUEST_CODE) {
            if (!checkLocationPermissionGranded()) {
                requestCameraPermission();
                Toast.makeText(HomeActivity.this, "Permission Not Granded", Toast.LENGTH_LONG).show();
            } else
                location = getUserLocation();
        }

    }


Capture Image

  Using takePicture() method we will capture Image , Once capture the image it will execute the override method  onActivityResult


private void takePicture() {
    Intent takePictureIntent = new Intent(MediaStore.ACTION_IMAGE_CAPTURE);
    if (takePictureIntent.resolveActivity(getPackageManager()) != null) {
        File photoFile = null;
        try {
            photoFile = createImageFile();
        } catch (IOException ex) {
        }
        if (photoFile != null) {
            ProfilePicUri = FileProvider.getUriForFile(HomeActivity.this, "com.android.myapplication.fileprovider", photoFile);
            takePictureIntent.putExtra(MediaStore.EXTRA_OUTPUT, ProfilePicUri);
            startActivityForResult(takePictureIntent, Constants.IMAGE_CAPTURE_CAMERA);
        }
    }
}


@Override
public void onActivityResult(int requestCode, int resultCode, Intent data) {
    super.onActivityResult(requestCode, resultCode, data);
    if (requestCode == Constants.IMAGE_CAPTURE_CAMERA && resultCode == RESULT_OK) {
        if (ProfilePicPath != null && ProfilePicPath.trim().length() > 0 && !ProfilePicPath.isEmpty()) {
            File image_file = new File(ProfilePicPath);
            if (image_file.exists()) {
                Bitmap newProfilePic = BitmapFactory.decodeFile(ProfilePicPath);
                // Code to manage the bitmap
            }
        }
    }
}


---------------

Thanks For Reading, Wish you a Happy Coding....

API call using Volley StringRequest

          On this blog I am going to explain the API call using volley library, Here the API call is using a StringRequest.  For the API integration we are using Volley Library , So first we need to add the volley library dependency on the application's build.gradle file like,

    dependencies {
         compile 'com.android.volley:volley:1.1.0'
    }


StringRequest 

    String serviceUrl = "http://shidhin.net/api/ApiTest";
        
    StringRequest strReq = new StringRequest(Request.Method.POST, serviceUrl, new Response.Listener<String>() {
            @Override
            public void onResponse(String responseString) {
                try {

                    // Successfull request
                    
                } catch (Exception e) {
                    Toast.makeText(LoginActivity.this, "Api Error", Toast.LENGTH_SHORT).show();
                }
            }
        }, new Response.ErrorListener() {
            @Override
            public void onErrorResponse(VolleyError error) {
                Toast.makeText(LoginActivity.this, "Api Error", Toast.LENGTH_SHORT).show();
            }
        }){
            @Override
            protected String getParamsEncoding() {
                return "utf-8";
            }
        };


This is the simple request, If we want to pass the request parameters, Header or request encoding type etc, we can do it like,
Request Parameters

   @Override       
   public Map<String, String> getHeaders() throws AuthFailureError {
        Map<String, String>  params = new HashMap<String, String>();
        params.put("Accept","application/json");
params.put("Content-Type","application/json");
return params;
    }


Request Header

       @Override         
   public Map<String, String> getHeaders() throws AuthFailureError {
       Map<String, String>  params = new HashMap<String, String>();         params.put("Accept","application/json");     
       params.put("Content-Type","application/json");     
       return params; 
   } 


Final Reqest

This is an example StringRequest with Request Parameters and Request Header ( Request Parameters and Request Header are optional on a request).


StringRequest strReq = new StringRequest(Request.Method.POST, serviceUrl, new Response.Listener<String>() {
            @Override
            public void onResponse(String responseString) {
                try {
                    
                    // Successfull request

                } catch (Exception e) {
                    Toast.makeText(LoginActivity.this, "Api Error", Toast.LENGTH_SHORT).show();
                }
            }
        }, new Response.ErrorListener() {
            @Override
            public void onErrorResponse(VolleyError error) {
                Toast.makeText(LoginActivity.this, "Api Error", Toast.LENGTH_SHORT).show();
            }
        }){
            @Override
            protected Map<String, String> getParams() {
                Map<String, String> params = new HashMap<String, String>();
                params.put("username", userName);
                params.put("Password", password);
                return params;
            }
            
            @Override
            protected Map<String, String> getParams() {
                Map<String, String> params = new HashMap<String, String>();
                params.put("username", userName);
                params.put("Password", password);
                return params;
            }
            @Override
            protected String getParamsEncoding() {
                return "utf-8";
            }
        }
    });
com.android.volley.RequestQueue requestQueue = Volley.newRequestQueue(this);
requestQueue.add(strReq);


---------------
Thanks For Reading, Wish you a Happy Coding....
June 19, 2018

Simple Date functions

On this blog I am going to explain some date functionality's which we are commonly used in our android application. 


Current Date Time

public static String getCurrentDate() {
    String DATE_FORMAT_NOW = "dd/MM/yyyy";
    SimpleDateFormat sdf = new SimpleDateFormat(DATE_FORMAT_NOW);
    return sdf.format(new Date());
}
      
      This function will return the current system date and time on  dd/MM/yyyy HH:mm this format. There is so many other different Date time formats are available,  You can replace the current format (dd/MM/yyyy HH:mm) with your date format if you need.


Compare two Date Time


public static boolean checkDateBeforeFirstDate(String first, String second) { 
    try {        
        String DATE_FORMAT_NOW = "dd/MM/yyyy HH:mm";        
        SimpleDateFormat sdf = new SimpleDateFormat(DATE_FORMAT_NOW);        
        Date firstDate = sdf.parse(first);        
        Date secondDate = sdf.parse(second);        
        if(secondDate.before(firstDate))            
            return true;        
        else            
            return false;    
    }catch (Exception e){        
        return false;    
    }
}


             This function will return true or false by comparing the given 2 dates, Here I am used date time format as  dd/MM/yyyy HH:mm this. There is so many other different Date time formats are available,  You can replace the current format (dd/MM/yyyy HH:mm) with your date format if you need. 


Change Date Time Format
public static String changeToServerFormat(String time) {
    String inputPattern = "dd/MM/yyyy HH:mm";    
    String outputPattern = "yyyy-MM-dd HH:mm";    
    SimpleDateFormat inputFormat = new SimpleDateFormat(inputPattern);    
    SimpleDateFormat outputFormat = new SimpleDateFormat(outputPattern);     
    Date date = null;    String str = null;     
    try {        
        date = inputFormat.parse(time);        
        str = outputFormat.format(date);    
    } catch (ParseException e) {        
        e.printStackTrace();    
    }   
    return str;
}
                   This function will return the converted format date string. On the above function will convert dd/MM/yyyy HH:mm format date time string to yyyy-MM-dd HH:mm. There is so many other different Date time formats are available, You can replace the input or output date time format with your date format if you need. 


Current Week Days

public static ArrayList<String> currentWeekDaysOfMonth() {
    ArrayList<String> weekDays = new ArrayList<>();
    Calendar cal = Calendar.getInstance();
    cal.setFirstDayOfWeek(Calendar.SUNDAY);
    cal.set(Calendar.DAY_OF_WEEK, cal.getFirstDayOfWeek());
    SimpleDateFormat date = new SimpleDateFormat("EEE dd MMMM yyyy", Locale.ENGLISH);
    for (int i = 0; i < 7; i++) {
        String weekDay =  date.format(cal.getTime()); 
        Log.v("WeekDays", "Date: " + weekDay);
        weekDays.add(weekDay);
        cal.add(Calendar.DAY_OF_WEEK, 1);
    }
    return weekDays;
}


                  This function will return the current weeks days as a String ArrayList. On the above function will return the date on EEE dd MMMM yyyy format. On the above function it will return the current weekdays starting from Sunday (We can specify it using .setFirstDayOfWeek(Calendar.SUNDAY) code). 


---------------
Thanks For Reading, Wish you a Happy Coding....


Custom Dialog in Kotlin

               On this blog I am going to explain How to create and display a custom Dialog on Kotlin. Here I am going to display a dialog with custom Title and Message which I pass to the dialog. 


colors.xml 
<?xml version="1.0" encoding="utf-8"?>
<resources>
    <color name="colorPrimary">#DB3236</color>
    <color name="colorPrimaryDark">#C52D30</color>
    <color name="colorAccent">#111111</color>
    <color name="iconColor">#9a9999</color>
    <color name="Black">#000000</color>
    <color name="White">#fff</color>
    <color name="LightBlack">#111111</color>
    <color name="Gray">#777777</color>
    <color name="DarkGray">#444444</color>
    <color name="MediumGray">#dddddd</color>
    <color name="LightGray">#f5f5f2</color>
</resources>


styles.xml 
<resources>
    <style name="App_TextView_Normal">
        <item name="android:textColor">@color/DarkGray</item>
        <item name="android:textSize">14sp</item>
        <item name="android:fontFamily">@font/biryani</item>
        <item name="android:gravity">center</item>
        <item name="android:layout_width">match_parent</item>
        <item name="android:layout_height">match_parent</item>
    </style>
    <style name="App_TextView_Title">
        <item name="android:textColor">@color/DarkGray</item>
        <item name="android:textSize">16sp</item>
        <item name="android:fontFamily">@font/biryani</item>
        <item name="android:gravity">center</item>
        <item name="android:textStyle">bold</item>
        <item name="android:layout_width">match_parent</item>
        <item name="android:layout_height">match_parent</item>
    </style>

    <style name="App_TextView_Button">
        <item name="android:textColor">@color/DarkGray</item>
        <item name="android:textSize">16sp</item>
        <item name="android:fontFamily">@font/fjalla_one</item>
        <item name="android:gravity">center</item>
        <item name="android:layout_width">wrap_content</item>
        <item name="android:layout_height">match_parent</item>
        <item name="android:minHeight">40dp</item>
    </style>
</resources>


rounded_white_bg.xml 
<?xml version="1.0" encoding="utf-8"?>
<layer-list xmlns:android="http://schemas.android.com/apk/res/android" >
    <item>
        <shape android:shape="rectangle">
            <stroke android:width="1px" android:color="@color/White" />
            <solid android:color="@color/White" />
            <corners android:radius="10dp"/>
        </shape>
    </item>
</layer-list>


info_dialog.xml 

This is the dialog layout file. You can remove the background colors, text colors and styles.

<?xml version="1.0" encoding="utf-8"?>
<LinearLayout xmlns:android="http://schemas.android.com/apk/res/android"
    android:layout_width="match_parent"
    android:layout_height="wrap_content"
    android:orientation="vertical"
    android:background="@drawable/rounded_white_bg"
    android:paddingTop="5dp">
    <TextView
        android:id="@+id/txtTitle"
        style="@style/App_TextView_Title"
        android:layout_width="match_parent"
        android:layout_height="wrap_content"
        android:layout_marginRight="10dp"
        android:layout_marginLeft="10dp"
        android:paddingTop="10dp"
        android:text="@string/Title" />
    <TextView
        android:id="@+id/txtMessage"
        style="@style/App_TextView_Normal"
        android:layout_width="match_parent"
        android:layout_height="wrap_content"
        android:text="@string/Description"
        android:gravity="center|top"
        android:minLines="2"
        android:padding="5dp"/>

    <TextView
        style="@style/App_TextView_Normal"
        android:layout_width="match_parent"
        android:layout_height="1px"
        android:layout_marginTop="1px"
        android:layout_marginBottom="1px"
        android:background="@color/MediumGray"/>

    <Button
        android:id="@+id/btnOK"
        style="@style/App_TextView_Button"
        android:layout_width="match_parent"
        android:layout_height="wrap_content"
        android:background="@color/White"
        android:layout_marginRight="10dp"
        android:layout_marginLeft="10dp"
        android:textColor="@color/colorPrimary"
        android:text="@string/OK" />
</LinearLayout>


InfoMessageDialog.kt

This is the kotlin class file, We will pass the "Title" and "Message" to the Dialog class and it will be displayed on the class. 


class InfoMessageDialog(context: Context, private var title : String, private var message : String)  : Dialog(context) {

    var mContext: Context
    var mTitle : String
    var mMessage :String

    init{
        this.mContext = context
        this.mTitle = title        this.mMessage = message    }

    override fun onCreate(savedInstanceState: Bundle?) {
        super.onCreate(savedInstanceState)
        requestWindowFeature(Window.FEATURE_NO_TITLE)
        setContentView(R.layout.info_dialog)
        window!!.setLayout(WindowManager.LayoutParams.MATCH_PARENT, WindowManager.LayoutParams.WRAP_CONTENT)
        setCanceledOnTouchOutside(true)

        var txtTitle = findViewById<TextView>(R.id.txtTitle)
        var txtMessage  = findViewById<TextView>(R.id.txtMessage)
        var btnOK  = findViewById<Button>(R.id.btnOK)

        txtTitle.setText(mTitle)
        txtMessage.setText(mMessage)

        btnOK.setOnClickListener(View.OnClickListener {             dismiss()
        })
    }
}


We can show this dialog using,

Fragment Page,


InfoMessageDialog(activity, getString(R.string.No_Network_Title), getString(R.string.No_Network_Message)).show();


Activity Page,

InfoMessageDialog(this, getString(R.string.No_Network_Title), getString(R.string.No_Network_Message)).show();


---------------
Thanks For Reading, Wish you a Happy Coding....

Splash Screen on Kotlin language

         On this blog I am going to explain how to show a splash screen using Handler. You can find more about Handler from Here.

Here I am using a delay of 4000 MS (4 Seconds)


Here I am using  postDelayed function for this,

fun postDelayed(r: Runnable!, delayMillis: Long): Boolean


Sample Code

override fun onCreate(savedInstanceState: Bundle?) {
    super.onCreate(savedInstanceState)
    setContentView(R.layout.activity_splash)
   
    Handler().postDelayed({
                 //Here Comes the code to execute after the time delay
      }, 4000)
}


---------------
Thanks For Reading, Wish you a Happy Coding....


Create new Kotlin Project

                   
On this blog I am going to explain How to setup new Kotlin project on Android Studio. To setup new project on Kotlin on Android project we need Android Studio version 3.0 or more. For older version of studio we can user Pligins. You can able to download by selecting "Install JetBrains plugin". 

Here is the steps to start new Android Project with Kotlin Support.


Goto File => New => NewProject


While select New Project you can see the Create New Project window
              

 You can add the project details such as Application NameCompany domainProject LocationPackage name etc. And By selecting "Include Kotlin Support" you can enable the Kotlin support on your Project.

After This Screen while tap on "Next" button it will show the screen to Select the Target Device,
              

This screen will allow you to choose the Android  Target Device you need, While tap on Next button it will show the Choose Activity Screen
              

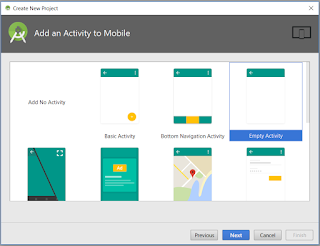
On this screen you can select the Type of Activity we need on the Application. While Tap on Next button it will show the screen to Configure the selected Activity page.
              

On this Screen we can Add the Activity Name and the layout name. And while Tap on Finish button it will Create the New Project with your Configurations. While tap on finish button it will setup your first project. Here is the project window.


---------------
Thanks For Reading, Wish you a Happy Coding....